You probably have wondered why I didn't post for a while:) I was little bit busy with doing something else than card making and blogging. I was having last exams and now I officially own MBA title:) I made it! I finally graduated! Me and my classmates were celebrating our fresh titles on a lake grilling and having great time the whole weekend. The weather wasn't that great but we enjoyed the free time anyways. Hope your weekend was great too!


...dry the petals. Here is another great opportunity to recycle. How about recycling dying roses? The petals are a great ingredient for making scented bags!

I am kinda stuck with wedding invitations since I find out that I have to make (still can't believe it!) 55 additional wedding invitations for my friend Romana, and I still come up with new ideas about other designs that I want to put on paper or made out of paper:) So how about this layout??? Would you prefer something like this?
I used a fancy font, print out the text on white cardstock on my printer in black, and slip it into a transparent envelope that I made out of sheer paper. I used pink stamp color and transparent embossing powder for the flower on the envelope. Simple and elegant, that's how I like it:)
This is how I spent my days. I didn't have time to make anything creative these last days...well, if I'm not counting the pictures of frogs I took...again:) But, I mean anything out of paper or beats or fabric or...you know what I mean:). So, at least I'll show you in pictures how I spend my days.
I told you I love frogs, right? Just checking:) I found two this time and we had fun together taking pictures. They were probably more happy when I let them go though.
I was really excited because I got these wonderful markers for illustrations. They are not Copics but from Faber-Castell. Copics are really hard to get in Slovakia and the same with these but I got lucky and found them in a catalog of the company that distributes the brand here in Slovakia. And they are awesome!!! Now, I am stamping and coloring everything:)
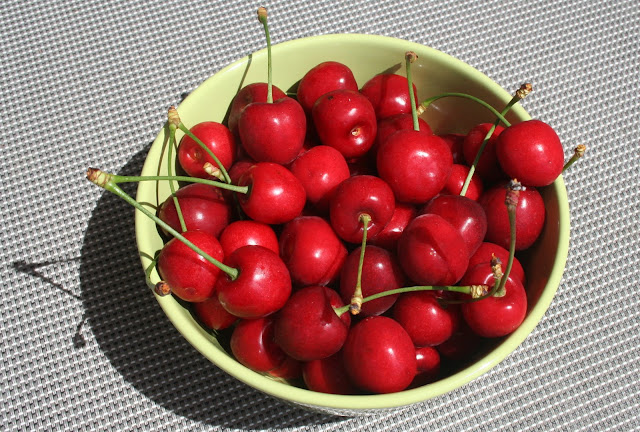
I love cherries!!! Can anything be better than cherries? Yes, sitting on the branch and eating them right of the tree:)))
I had a a lot of work with cleaning our garden and that means I had to work on our pond too. The water lilies are in full bloom and the fishies are getting more hungry every year.
My program was also filled with brushing my dog. It is adventure I can tell you that. Every time, he looses his winter fur he is shedding like a sheep. You could probably knit couple sweaters out of his dog-wool:)) Hmmm...maybe next craft project?:)
There is still a lot of work in our garden. I worked little bit on the rosebush that is getting too big and I put the cut roses into a vase and now, I can enjoying them inside as well. Enjoy your weekend!!!
I wanted to show you something from my crafting kingdom. It is still in process as I definitely need new color on the wall (I am fed up with the light yellow), probably new table, and some more storage boxes. I want to paint the wall with a pea green color or the color of the little green frogs we have in our garden:) I was also thinking about rich orange and dark brown but I think the green idea is still holding me.
Here is the view from the door at my table and two skylights...
...my table, my stamps, my picture of NY city I took 8 years ago, roses from our garden, and much more...
...the paper storage, collection of craft books, bunch of scissors...
...jars from Ikea are great to store feathers, stones, wires, and and and...
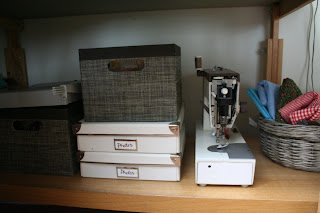
...the space under one of my tables. Here you can see my old sewing machine:)))...
...the other side - stuff and stuff, a lot of stuff...
...and here is my 3 story stand that is sooo handy...
...and all my treasures are hidden in these trunks...
Hope you enjoyed the little peek into my room. Next picture show will be hopefully with new color on the wall:)) Have a great evening!
Here is the view from the door at my table and two skylights...
...and here is my 3 story stand that is sooo handy...

I was thinking about additional service when we make wedding bouquets, buttonieres, table & car decoration, & so on. How about initials for the bride and groom made from pearls or any other beats, either plastic, glass, or even little, ratan balls. Here are the steps...
...we will need a thick wire, a thinner floral wire, hammer, wire cutters, pliers, and plastic pearls. I got mine in floral warehouse but you can use any pearls you like...
...Let's move on to the first step. Cut a piece from the thick wire long enough for the letter, in this case we are making an M. The length depends also how big the letter should be. The wire in this projects is around 56 cm long (around 22inches)...
...form it into the shape of the initial letter. You can use your pliers or just use your hands...
...now we move to the thinner floral wire. Cut a long piece and twist the wire making a little loop to secure the first pearl...
...like this:) Make sure the wire is flexible before you use it because we will wrap it around the thick wire together with the pearls...
...continue with stringing the beats or should I say wiring? ...
...we need a lot of pearls! Make sure you put enough beats on the wire to cover the whole letter shape. I used exactly 72 pearls for 56 cm long letter base (around 22inches)...
...now we can start with wrapping the line of pearls around the thick wire using the thinner wire...
...in this case, don't cut the wire. Just keep it on the wire ball and wrap it around...
...we wrap the wire in between each pearl attaching it to the letter base...
...continue to the end of the letter base...
...make sure the pearls are not moving and are attached to the base tide...
...next step is making the little loops for the ribbon that will hold the letter either to a chair were groom & bride will sit or where ever you want to attach it to. It looks good also on a wreath in a church or it can be added to any decoration used in the wedding. It is a nice touch to make the event even more personal. To make the loops more flat you can use also a hammer...
...now just slip the ribbon through the loops and we are done!!!
...here are two versions how it can be wrapped around the chair. Each chair is different and you need to be creative:)...
I hope you enjoyed another one of my tutorials:) Have a great rest of the weekend:)
...we will need a thick wire, a thinner floral wire, hammer, wire cutters, pliers, and plastic pearls. I got mine in floral warehouse but you can use any pearls you like...
...continue with stringing the beats or should I say wiring? ...
I was trying to make a simple birthday cards. Simple wasn't that simple. It was harder than I thought:) I tried the sewing effect again. I really like to sew my cards but I definitely need to buy a new machine! To save my nerves at least or maybe I just need to be more patient... no, no.. I definitely need a new sewing tool:) Let's say that I just want a new model to feel better:) I have two versions of this card, one with a red heart (fancy!)) and the other with a white dove (little bit complicated to stuff it into envelope). I think I like the idea with the heart better, definitely more practical:)

This one has more sewing on it. Looks little bit chaotic:) I put letter beats on it presenting 'Happy Birthday' in initials.
That's all form me for today:) Have a great Friday... weekend is almost here!!!
I am trying! I am trying to get into sewing again and I hope I will get better eventually. I always admire people on other blogs or Etsy who make beautiful sewing and knitted projects. My mom was sewing and knitting a lot when she was younger and my grandma as well. But unfortunately, they did't really have time to teach me all the techniques when I was growing up. So, I am trying to teach myself. I'm not sure if I have the patience for it though. We'll see how long I'll last but I'm really trying hard. I did these two pin cushions out of baby food jars and old scraps of fabric that my mom had. Basically the whole project is made out of recycled materials. One is for my mom and the other for my grandma because they never can find their needles and pins.
I felt like showing you a tutorial again. I'll teach you how to make a decorative ornament for a wine bottle. I don't like to buy decorative bags for bottles or wrapping it in a paper as it is always tricky to pack. I rather make something dimensional like this heart. Trust me, it's very easy to make.
So, first what you need is something like this (#1)... I know, it looks like I stole some building material from a bird-nest but this bundle can be found on any field out in nature where all the wild decoration material grows. It's some sort of dry hay but the stalks are really flexible when they are freshly collected. Next
item you need is a thin wire. I use this floral wires (#2) that are little
bit crinkled but it doesn't matter if it's crinkled or not. I picked a gold one for this project but it's up to you what color you want to use. As you
can see there are many color options. If the hey is too dry (like in this case) you can just soak it in cold water for couple minutes to gain back the flexibility (#3). Let it dry a little bit on the sun but not too long. Basically, we can't have dripping water when we start to use it. Take a bundle of the hey, cut a longer piece of the wire (#4 & 5) and
start to wrap it around the bundle forming it into a shape you want. We are going for a heart this time... (#6) continue wrapping the wire all around the bundle every direction to hold the shape of a heart.
I left a tail on the bottom and tied a red satin ribbon around it...
Now, just cut a piece of wire, attach it to the back of the hearth and tie it around the neck of the bottle...
Potom už len odstrihneme d'alší kúsok drôtika, prevlečieme cez zadnú stranu hotového srdiečka a uviažeme okolo hrdla fľaše...
...and a pretty bottle decoration is done!!!
a máme hotovo!!! Jednoduché, nie?
It's that easy!!! Let me know how your bottle decoration worked out:) Have a good one!
Mám pre Vás d'alší tutoriál - návod ako si urobiť dekoratívny
ornament na fľašu. Nemám moc rada darčekové tašky a baliť fľašku vína do
papiera je horor. Radšej tomu dám šmrnc nejakou tou 3D ozdobou ako toto
srdiečko. Verte mi, je veľmi jednoduché si také vyrobiť.

Takže na
postup budeme potrebovať 'toto' ako vidíte na č.1.
Viem, 'toto' vyzerá ako by som nakradla stavebný materiál z vtáčieho hniezda, ale je to obyčajná suchá travina ktorú nájdete po celom
Slovensku. Stačí si výjsť na výlet za činžiak do lesíka. Ak nemáte
štastie tak postačí aj stará dobrá slama či takzvaný farebný sisal. D'alej to bude floristický drôtik ako vidíte na č.2 ale postačí hocijaký
tenší drôtik. Ak je slama moc suchá tak ju treba na pár minút namočiť
aby sa nám nelámala. Nechajte ju trošku potom presušiť na slniečku ale
nie úplne do sucha, len tak aby z nej proste voda nekvapkala (č.3).
Musí ostať pružná. Ak používate sisal, tak ten je pružný dosť a netreba ho vobec namáčať.
Pokračujeme na č.4, 5 a 6 - pripravíme si kôpku už namočenej a
presušenej traviny a kus dlhšieho drôtika a začneme modelovať srdce
maškaním traviny do seba a obalovaním drôtika naokolo, dookola,
hocijakým smerom.

Nechala som na spodu také fúziky aby som mohla
priviazať na ne červenú mašličku.

Potom už len odstrihneme d'alší kúsok drôtika, prevlečieme cez zadnú stranu hotového srdiečka a uviažeme okolo hrdla fľaše...
...and a pretty bottle decoration is done!!!
a máme hotovo!!! Jednoduché, nie?